We continue to be amazed at the many creative and valuable ways that people are using SmartThings to complement their unique preferences and lifestyles.
In the post below, a member of the SmartThings Community named “florianz” describes how he’s transformed a normal Android tablet into a sleek wall-mounted device to control his smart home. Check it out!
“All the lights in my house are controllable through SmartThings, but not all of them are wired up to wall switches. I do have a bunch of floor and table lamps, which are hooked up to GE receptacles and plug-in lamp modules. It’s a bit of a PITA to have to bend down to actuate the modules. Whipping out my phone to launch the SmartThings Mobile app to control the lights can be cumbersome and slow, and I’m not a big fan of the idea of having physical remotes floating around the house. I wanted a solution with the immediacy of a physical switch, but some of the flexibility of the mobile app. Here is what I came up with:

Hardware
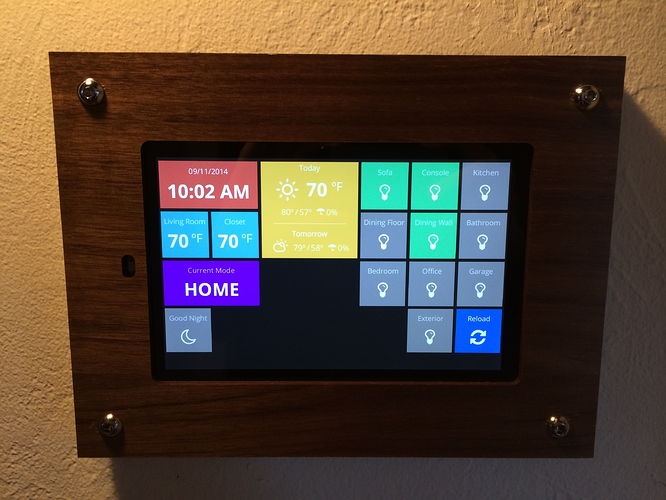
This is essentially a wall mounted Nexus 7 Android tablet3, which I was able to acquire for cheap. I built a custom frame using a laser cut premium walnut veneer from ponoko.com7. The frame basically consists of a face- and backplate which are held together by four chrome internal hex screws. There are also internal pieces that keep the tablet aligned and in place. Initially, I planned on gluing everything together in order to keep the faceplate clean, but I figured it might not be a good idea to permanently enclose the tablet. The chrome screws are a good compromise as they allow me to open up the frame, but also serve a decorative purpose. The tablet is firmly mounted using two key hole hangers1 attached to the back of the frame, which rest on screws inserted into dry wall anchors.
Interface
The interface consists of a Dashing12 installation running on a free Heroku16 instance. Dashing is a really cool dashboard framework. What I love most about it is how minimalist, yet customizable it is. It’s just a few hundred lines of code on top of some widely adopted web technologies, including Sinatra2, Batman.js3, Gridster3 and Sprockets2. You can easily create new backend services using Ruby, and frontend widgets using CoffeeScript, SASS and HTML.
I created a bunch of “touchable” widgets, which let me control lights, display temperature sensor readouts, see the currently set mode, set new modes and execute “Hello Home” phrases, as well as display information about the current weather and forecast. I also created a backend, which communicates with a basic SmartApp endpoint. Dashing uses Server Side Events3, so events handled from inside the SmartApp are automatically pushed out to the client. Basically, when you turn on/off a light using a switch or the SmartThings app, the dashboard will automatically and instantaneously update with the new state. It doesn’t need to bang on the SmartThings cloud or the backend to continuously poll for updates (apart from the weather, which is updated every 15 minutes).
The Dashing frontend can be displayed in any browser, so it’s relatively easy to deploy multiple clients (one in every room, if you want to go crazy) or get access from your computer.
Tablet Setup
The frame doesn’t expose the physical power button on the tablet. Instead, I am using the camera as a motion detector to wake up the Nexus 7, when someone steps in front of the screen. Tasker1 is used to handle the motion detector events and wake up the tablet using Secure Settings1 without requiring root access. It’s a bit hacky, but has been working reliably, so far.
The Dashing frontend is being displayed in Firefox, because Chrome suffers from a bug that severs the connection to the Server Sent Events source when the tablet goes to sleep, and fails to resume that connection when it wakes up. To hide the annoying Android on-screen navigation controls (and status bar), I have to force the tablet into “Immersive Mode”. I am using an app2 for that, because the feature is a relatively new addition to Android, and not all apps properly take advantage of it, yet.
Mounting Location
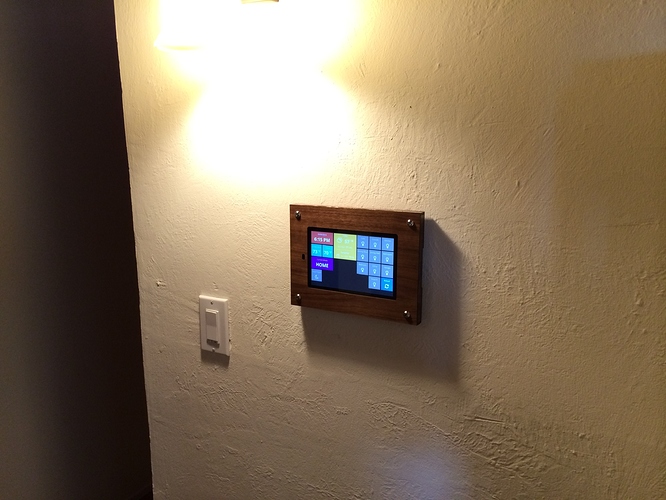
I mounted the assembly in the hallway, opposite to my front door. I chose the location because it is central, yet not obtrusive. I pass through the hallway when I go to bed, or leave the house so it’s very convenient to take a look at the weather or turn on/off some lights at that point. The front-facing camera has a great view of the front door and will eventually snap pictures of anyone entering the house unexpectedly. This is also the place where a security system panel had been mounted, before I switched to SmartThings.
Conveniently, there is a storage closet on the other side of the wall. I simply drilled a small hole through the wall to feed a Micro USB cable to a wall charger in the closet. The frame hides said hole in the wall. A cleaner setup would be to install a recessed gang box4 with a USB outlet4 behind the frame. I want to evaluate the current setup, before I commit to a bigger hole in my drywall, though. The current hole is easy to close ![]()

Future Plans
I am going to add more widgets in the future. The idea is not to replace the functionality of the SmartThings app, but to display useful information about what’s happening around the house, allow for making more informed decisions and enable some basic control over devices. For example, it would be great to be alerted about open windows, before leaving the house. Also, having a widget that shows current energy consumption and realtime pricing information would be cool (Is now a good time to do the laundry or run the electric space heater?) On top of that, I want to play around with speech synthesis in order to emit audible alerts.
Lastly, it would be cool to get some NFC tags2 to wave around to cause certain things to happen. I don’t really have any concrete ideas for that yet, though.” – florianz
Continue the discussion of this project on the SmartThings Community Site.


